
If you run a business that takes deposits or payments before you start a job or project, then this feature in QuickBooks is for you.
In Washington State, if you are reporting in cash basis, sales tax is reported when money has been received against a sale. The key words here are “against a sale”. Sometimes, money is received, but not associated with a sale, yet. As in a customer deposit prior to work. But the ruling also states that when you hold a customer deposit before billing, that deposit is subject to a full refund if the customer decides they don’t want you to finish the job…despite the money you already put into supplies and purchases that are no longer returnable.
Therefore, industry standards have provided a solution to this. It’s called “progress invoicing” and QuickBooks has provided a way to use this standard to help your business thrive.
Progress invoicing is available in all versions of QuickBooks Online and QuickBooks Desktop. If you don’t see it available on your screen, it needs to be activated from the settings gear in QBO or the Preferences in QBD.
Here’s how it works:
- You create the customer. If you are construction, or other business that does different projects for one customer, then you also create a job or project for that customer.
- You create an estimate of the services and/or products you will be selling to that customer/job.
- You and the customer agree to accept the estimate and work begins.
- As you complete portions of the estimate, or purchase goods for the completion of the estimate, you invoice the customer for payment to cover that portion.
- When the customer pays the progress invoice, that sale shows up on QuickBooks’ Sales Tax Liability Report and you include it when you record your Washington State Excise Tax Return. This will help diffuse the cost of sales tax due over time, which is nice if you happen to be working on a very large project.
- Because you invoiced the customer and the customer paid and agreed to that portion of the estimate completed, you are not obligated to return the full amount of the product or service. Which saves you the loss of product if the customer backs out of the deal. However, how nice a guy you want to be with your customers is up to you when it comes to service.
How to accomplish progress invoicing in QuickBooks.
Below are instructions from the QuickBooks Support Page on how to get started with progress invoicing. Because QuickBooks updates regularly, what you see in the instructions may differ slightly to what you see on your software version, however it should not be too hard to figure out if you take your time and read the screen prompts. Remember, set up always takes time, but in the long term, the returns are worth it.
If you have any questions, please feel free to contact me.
Thank you.
1. Set up and send progress invoices in QuickBooks Online
Progress invoicing lets you split an estimate into as many invoices as you need. Instead of asking for full payment at the beginning of a project, you can invoice customers for partial payments. As you complete work, add items from the initial estimate to progress invoices. This keeps project payments organized and connected from start to finish.
| Note: This feature isn’t available yet for the new invoicing experience. If you have the new version, you can switch to the old version to use this feature. Find out which version you have and what changes when you switch. |
Step 1: Turn on progress invoicing
If you haven’t already, turn on progress invoicing.
- Go to Settings ⚙ and select Account and settings.
- Select the Sales tab.
- In the Progress Invoicing section, select Edit ✎.
- Turn on the switch to Create multiple partial invoices from a single estimate.
- Select Save and then Done.
Now you can create multiple invoices from your estimates.
Step 2: Create a progress invoice template
Use the premade Airy style to create a new invoice template. You should use this template any time you create a progress invoice.
Note: As you make changes, a preview will display on the form.
- Go to Settings ⚙ and select Custom form styles.
- Select New style and then Invoice to create a new invoice template. Or, to update one of your existing templates, find the template and select Edit.
- Give the template a memorable name, like “Progress invoice template.”
- In the Design tab, select Change up the template or Dive in with a template.
- Select the Airy new template. This is the only template that works for progress invoices.
- Select Edit print settings or When in doubt, print it out.
- Make sure the checkbox for Fit to window envelope or Fit printed form with pay stub in window envelope is unchecked.
- Select the Content tab.
- Select Edit ✎ on the table section of the form (the second section with Activity, Rate and Amount).
- Select the Show more activity options link.
- Select the Show progress on line items checkbox if you want to show item details on the progress invoice.
- Select Edit ✎ on the footer section of the form (the third section with Total and Balance Due).
- Select Estimate summary if you want the invoice to display the estimate amount, the amounts of individual progress invoices, and the total amount invoiced so far.
- Select Done. You’ll be taken back to the Custom Form Styles page.
If you send a lot of progress invoices, we recommend using this as your new template for all invoices. To add the template you just created as your default template:
- If you’re not there already, go back to Custom Form Styles.
- In the Action column, select the dropdown menu ▼ next to the template. Then select Make default.
- Confirm your choice by selecting Change template.
Note: If you only want to use this template for a few progress invoices, you can have a different default template for regular invoices. Then, when you’re creating a new invoice, you can use the progress invoice template by selecting Customize directly on the invoice form.

Step 3: Create an estimate
- Select New ⨁ and then Estimate
- Select your customer.
- Fill out the rest of the estimate.
- Select Save and new, Save and close, or Save and send.
Note that the totals in the remaining column of your estimate don’t include sales tax, discount, or shipping costs.
| Tip: If you use the Projects feature (QuickBooks Online Plus and Advanced) and want to add an estimate to a project, add it before you start creating progress invoices. |
Need to edit something on your progress invoice?
If you need to edit an item on a progress invoice, make your changes on the original estimate, not the invoice itself. You can make changes as long as you haven’t invoiced for the total estimate amount.
Step 4: Create progress invoices from the estimate
There are a few ways to create progress invoices. Both methods give you the same results.
Create a progress invoice from the estimate
- Go to Bookkeeping, select Transactions, and then select All Sales (Take me there).
- Find the estimate on the list.
- Select Create invoice from the Actions column. You can also open the estimate and select Create invoice.
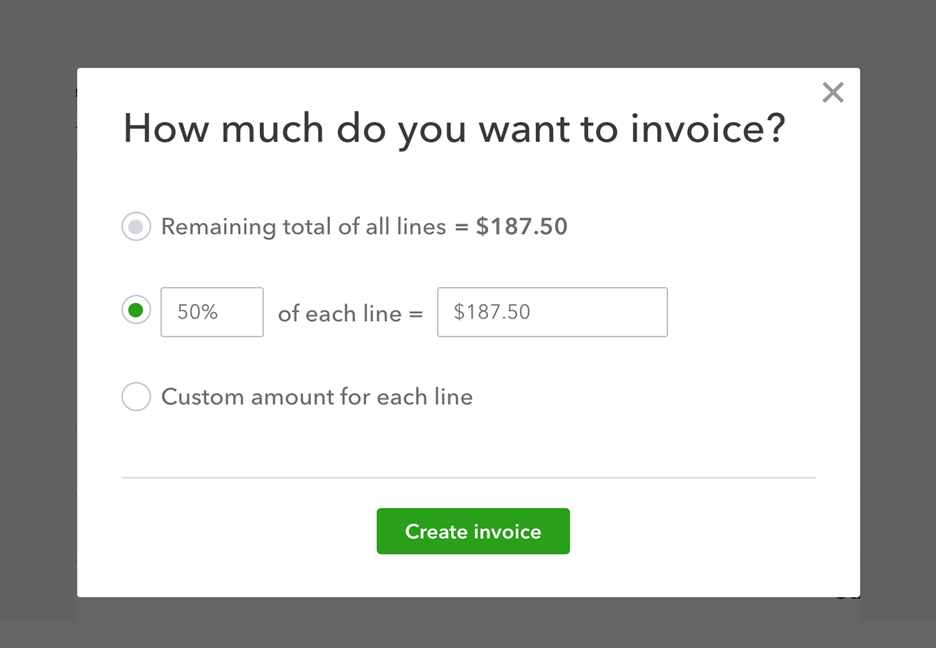
- Decide how much you want to invoice for, then select Create invoice. You can charge for a percentage or a specific amount. If you choose Custom amount for each line, enter a specific amount for each item on the invoice.
- Fill out the rest of the invoice.
- Select Save and new or Save and close.
Connect an estimate to a new invoice
- Select Create ⨁ and then Invoice.
- Select your customer from the dropdown menu. If the customer has an open estimate, QuickBooks will open the Add to Invoice sidebar.
- Find the estimate in the sidebar and select Add.
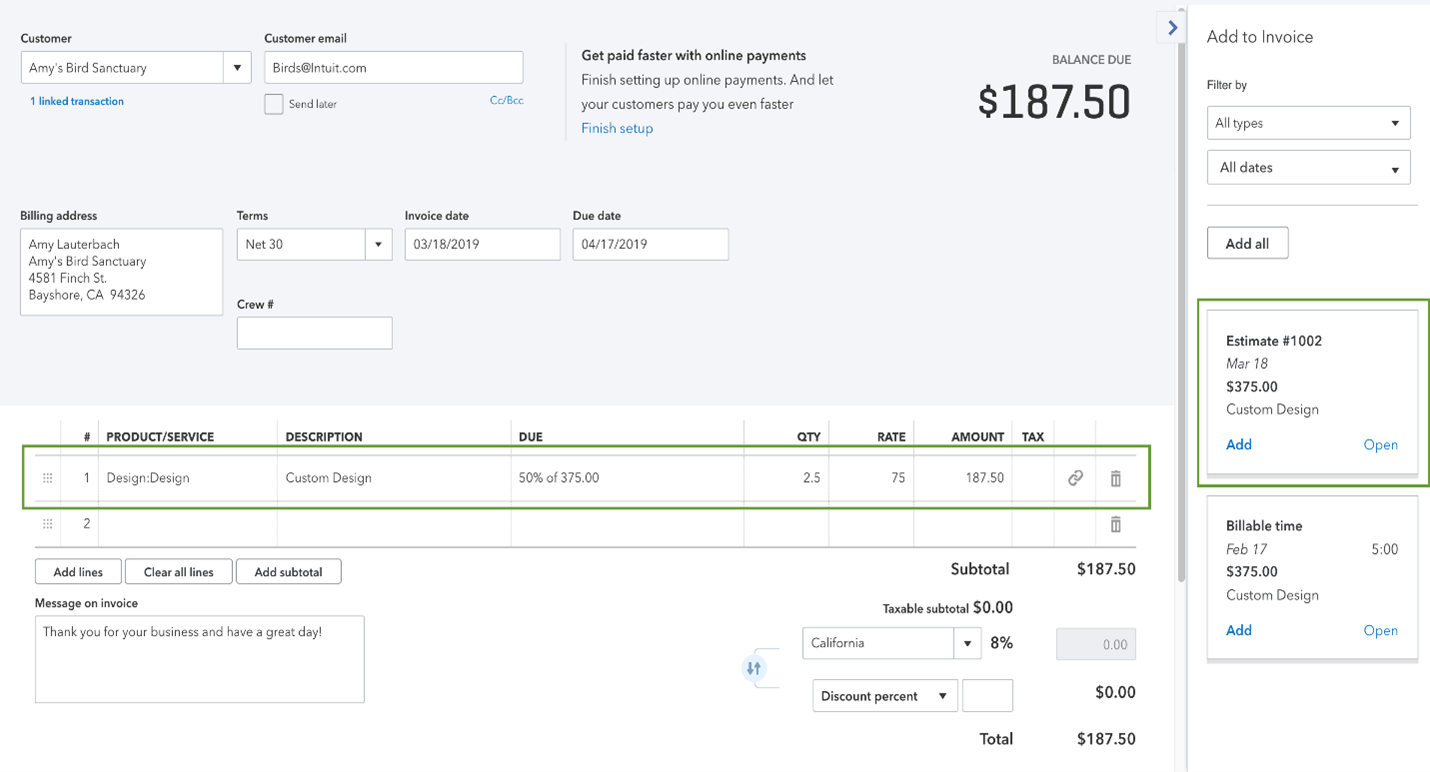
- Decide how much you want to invoice for and select Copy to invoice.
- Fill out the rest of the invoice.
- Select Save and new or Save and close.
Your original estimate won’t change when you create a progress invoice. QuickBooks keeps a record of both.
 | Don’t worry about accidentally sending too many invoices After you’ve invoiced for the total estimate, the estimate status automatically changes to Closed. If you try to invoice for more than 100% of the total estimate, you’ll only be able to add what’s left of the remaining balance. |
Need to unlink a progress invoice?
If you want to disconnect a progress invoice from the original estimate, select the trash icon for the estimate line item. QuickBooks will ask if you want to unlink the entire invoice. If you do, select Yes, unlink it.
Step 5: Keep track of your progress invoices
Review your estimate, progress invoices, projects, and reports to stay organized.
Review Estimate
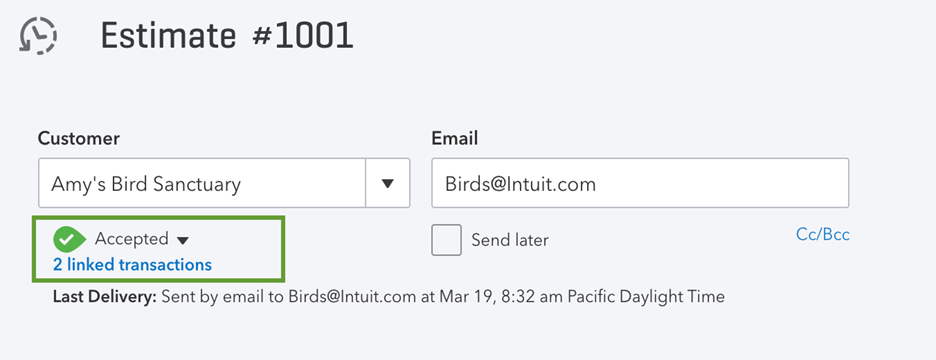
You can see all of your progress invoices on the original estimate.
- Go to Bookkeeping, select Transactions, and then select All Sales (Take me there).
- Find and open the estimate.
- Select the blue linked transaction(s) to see the invoices you’ve already created.
Review Progress Invoices
Progress invoices include an estimate summary with the total invoiced. There are also links to the original estimate and all relevant progress invoices.
You can add estimate summaries to invoices so your customers can see their remaining balance. This isn’t turned on by default.
Check Projects
If you add estimates to projects, you can see everything in the Transactions tab of a project page.
Run Reports
The Estimates & Progress Invoicing Summary by Customer report gives you a complete list of all estimates and connected progress invoices.
- Go to Business overview and select Reports (Take me there).
- Search for and open your Estimates & Progress Invoicing Summary by Customer report.
Transactions are organized by customer. Estimates have positive totals, and the progress invoices have negative totals.
2. Set up and send progress invoices in QuickBooks Desktop
Step 1: Turn on progress invoicing
If you haven’t already, turn on progress invoicing.
- Sign in to QuickBooks Desktop as an admin.
- Go to the File menu and select Switch to Single-user mode.
- Go to the Edit menu and select Preferences.
- Select Jobs & Estimates from the list of menus.
- Select the Company Preferences tab.
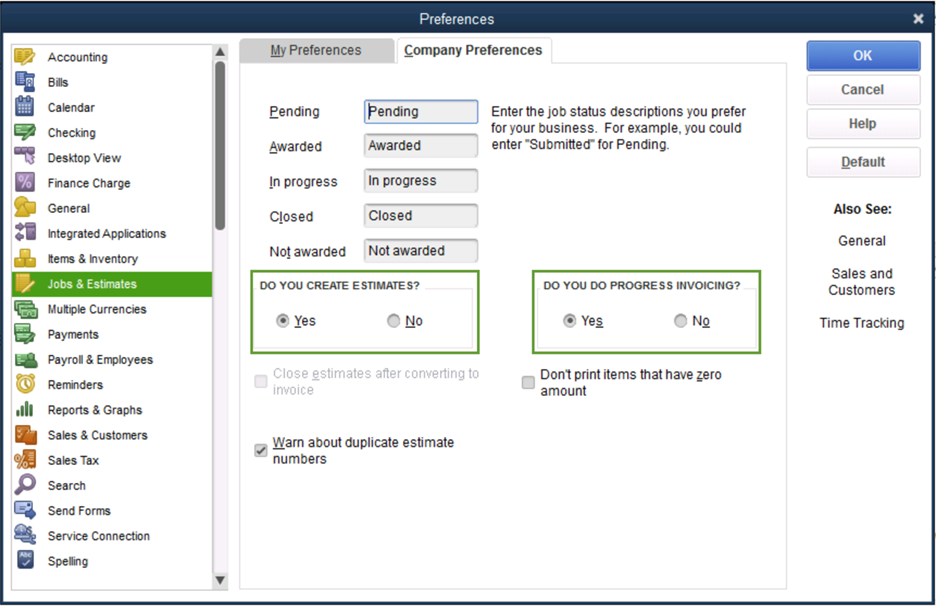
- Select Yes in the DO YOU CREATE ESTIMATES? section. Then select Yes in the DO YOU DO PROGRESS INVOICING? section.
- Select OK to save and close your preferences.
- If you need to, go back to the File menu and select Switch to Multi-user mode.
Now you can create invoices from your estimates.
Step 2: Create an estimate
- Go to the Customers menu and select Create Estimates.
- Choose your customer.
- Fill out the rest of the estimate.
- Select Save & New or Save & Close.
| Tip: If you use the jobs feature and want to add an estimate, add it to the job before you start creating progress invoices. |
Step 3: Create progress invoices from the estimate
For progress invoices, you work from your estimate instead of the normal invoice workflow.
- Go to the Customers menu and select Customer Center.
- Find and select your customer on the list.
- Find and open the estimate on the customer’s page.
- Select Create Invoice from the toolbar.
- Decide how much you want to charge on the invoice. You can charge for a percentage or a specific amount for selected items. Then select OK.
- Fill out the rest of the invoice and send it to your customer.

Your original estimate won’t change when you create a progress invoice. QuickBooks keeps a record of both.
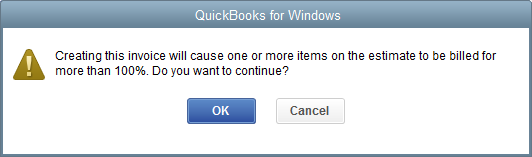
| | Don’t worry about sending too many invoices You’ll get a warning message if you try to create invoices for more than 100% of the estimated total. You can select OK if you want to continue creating the invoice. |
Create progress invoices for a job on QuickBooks for Mac
Create an invoice using an estimate.
- Open estimate and select Customers, then select Create Invoice.
- Select the info you want on the invoice. Then select OK.
- Remaining amounts on the estimate.
- Percentage of the estimate.
- Only certain items or percentage for each item.
- Select OK once you have determined the information you need for the estimate.
- Verify the amounts you want to include on the invoice and select Save.
To create the next progress invoice for this job, start with Step 1. Then the next invoice picks up where you left off with the remaining amount on the estimate.
Step 4: Keep track of your progress invoices
Review your estimates and reports to stay organized.
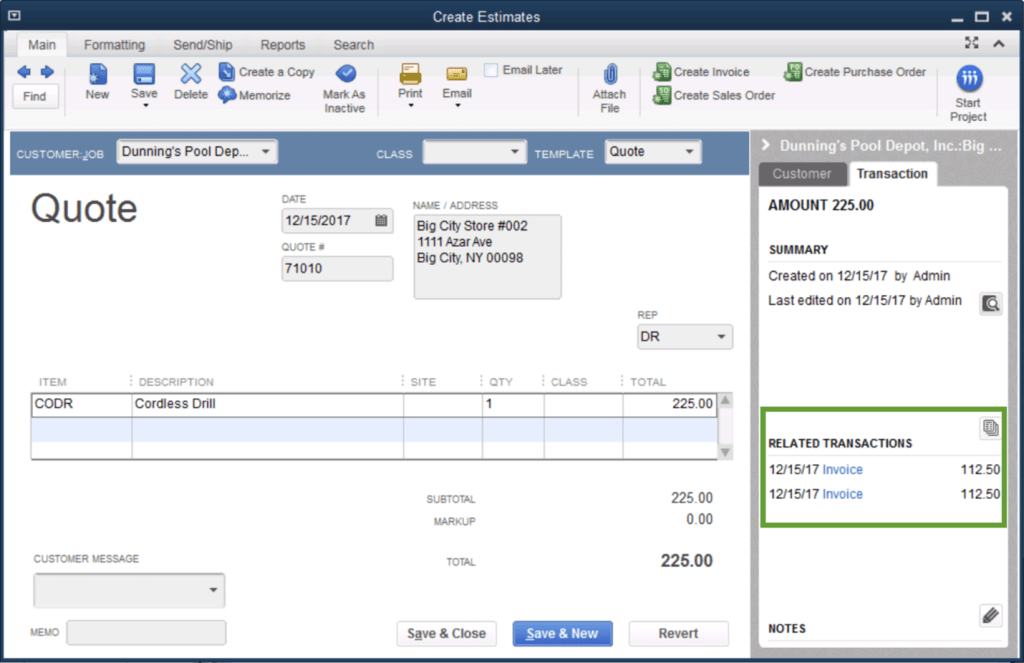
Estimates
The panel on an estimate provides useful info, such as the number of open estimates for a customer. To see all the progress invoices you created from an estimate, select the Transactions tab and go to the Related Transactions section.
Reports
Use reports to keep track of your progress invoices.
- Go to the Reports Center.
- Select the Jobs, Time & Mileage from the list.
- Scroll down to the Job Estimates section.
- Select Job Progress Invoices vs. Estimates.
Check out the Job Progress Invoices vs. Estimates report to track how much you invoice for each estimate.
